The Ultimate Guide to Recording Period Gun Sound Effects Pt. I
- Jeff Carpenter
- Apr 29, 2021
- 11 min read
Updated: May 5, 2021

Guns & Audio - what could be cooler? If you've ever wanted go record some of your own gun sounds then this read is for you.
Last year I had the killer experience of serving as Supervising Sound Editor for a Civil War era western filmed in Oklahoma. Of Course... no western is complete without the classic gunslinging shootouts between the cowboy and the bandit, and this story was no exception. Needless to say, I was stoked to be on board!
The film featured a classic arsenal of weapons: Henry, Remington, Winchester, Derringer, & Colts just to name a few. It was important that we stay true to these period weapon sounds, and not just reach for any old gun shot that a SFX library could offer. No no... our audience is smarter than that. This film will be seen by historians, weapons enthusiasts, and cowboys alike. At the very least we owe it to our audience to recreate the sound of these story in the most authentic and impactful manner possible.

Here's a little rundown of what you can expect from this write-up:
Record or Record Not?
Much to my delight, the film's director was very keen on making sure these guns sounded authentic and impactful. I looked in a number of places for the right library sounds but I just couldn't come up with anything that would authentically cover the whole film. Some of these "legacy" period gun libraries have a very distinct sonic character. Crossing between multiple sound libraries would present a massive dramatic shift that would destroy our element of authenticity. I needed all my sounds to be grounded in the same sonic space. Not to mention I wouldn't be able to cover all my needed perspectives with library sounds.
It became evident these SFX libraries were not going to cut it, this film's firearms needed their own sonic signature to tell a believable story. We needed to create our own library. We were off!
A Little R&D
Now... firearm sounds are not something you just wanna run out and capture without a solid plan in place. This needs a little R&D before ever stepping outside with a mic & recorder. Thankfully some heavy hitters have gone before us in this area, and left behind some great nuggets of advice on the topic.
Special thanks to Chuck Russom, Charles Maynes, and Frank Bry for their expert write-ups on the subject - these were my bible when I was just starting out.
Initially I noted the types of weapons, locations, microphones, mic placement, recording equipment, and safety protocols that they were using. This gave me a massive leg up vs. just jumping in from ground-zero.
The Popcorn Effect
You'll hear this term thrown around quite a bit when researching the topic of gun recording. "Popcorn Effect" describes the fact that firearms have an extremely loud and short transient pop when fired. The meat of the blast comes immediately after at a significantly lower volume. If you set your recorder to allow the transient to come through unclipped, you'll end with a result that sounds like popcorn popping - far from the sound we're looking for. Great recordists know that you have to be comfortable letting the initial transient go beyond clipping territory in order to capture the great stuff that immediately follows. More on this to come.
Needless to say... If you don't have the right equipment and the right planning in place, you could very well be coming home with unusable sounds. Take the time, do your research, and put a solid plan in place. Don't become a statistic!
Location, Location, Location
The ambient space a sound resonates in makes a massive difference on how we perceive it. Often times it's the ambient character of a recording that gives it it's size & weight - which is precisely the sound I was trying to achieve with these gun recordings. All of the gunshots in this film were outdoors, so we only needed the outdoor perspective.
Finding the right location to record in was a critical component to our success. Thankfully one of our sound editors had access to a large private tract of land with various valleys, hills, and canyons. So now was the time to set out with mic & rifle to run some serious tests! We wanted to audition as many reflective spaces as possible in this location.
I took along with me a stereo pair of Schoeps CMC6's placed on a Rycote ORTF handheld suspension rig in order for me to stay mobile. I stood about 12' directly behind the shooter with the mic rig aimed down range while he fired. On this day we tested about six different locations on the ranch, just to see what exactly was going to give us the reflections that we were looking for.
The seemingly obvious location for our shoot was the overlook of an expansive valley - firing down into the bottom in order to excite the acoustic space. I'd have gone to vegas on that location, however it was hands down beaten out by a small (3 acre) clearing surrounded by dense tries. The recordings were evident that the trees were giving us that very fast echo report that was creating a huge "bloom" to the sound. On the flip side... the canyon gave some nice long reverb tails, but it wasn't anything like the bloom we were getting from this little forest clearing.

Location... Check. Now it was time to find our armorer.
Show Me Your Guns

Now... Oklahoma is in no short supply of self-proclaimed weapons "experts", but we needed an armorer (weapons handler) with real world training and experience . It had to be someone with a massive arsenal of Civil War era weapons, and experience working in production. We turned to David, the armorer who supplied the weapons during production of the movie, and he was thrilled to reprise his role for our recording session.
Another bonus of using David was that he knew EXACTLY which characters used each weapon in the movie. So we could in turn take another step towards authenticity by matching the sound of the weapon to its owner.
Safety was our top priority for the session so we mutually agreed for our armorer to bring along a dedicated "safety monitor" specifically devoted to the task of making sure everything and everyone was safe at all times - a worthy investment.
Our armorer provided an impressive spread of period rifles, shotguns, and hand guns. Now I'm no weapons expert myself so I can't tell you the details about every single one, but I do know these beauties were loud and proud. He also brought along plenty of different ammunition options - different load sizes create different sounds.

The Mic Setup
When recording firearms, the equipment matters - this might be the understatement of the century. These guns have a massive raw power to them, approaching 160db. Much of the equipment available was not designed to handle this much sound pressure. Needless to say... planning and choosing your gear is important. I'll do my best here to give as much advice as I can on the subject.
Mic Selection:
Many dynamic mics can handle these levels at 5-10 Feet, however many condensers need to be used more conservatively and at further distances (10+ Feet). I like to use a combo of dynamic, condenser, boundary (PZM), and lavalier mics for the job.
Also... low end needs to travel some distance to fully materialize, so it's worth noting that putting mics hyper-close to the gun will not help you in capturing a massive beef or body to the sound. Moreover this is probably the most challenging aspect of recording firearms - capturing that massive chest thumping impact of the blast.
My approach to mic selection starts with Charles Mayne's "Fast Gun Template" with personal modifications that have come from our own trials and errors. These are the mics we used in this particular session:
2x Schoeps CMC6 w/ Cardioid Capsule
2x Schoeps CMC6 w/ Hyper-Cardioid Capsule
1x Crown SASS MKII Stereo
2x AKG C414
1x AKG C451
1x Sanken COS-11 Lavalier
Sure... many of these mics are staples for firearms recording, but a lot of the selection depended on what we had in our own locker and what we could get our hands on.
The Mic Setup:
This setup came through hours of testing, listening, refining, & repeating. I like to place most of the mics behind the shooter, as we've found that's the best position for getting our desired sound.
We set up several test shoots prior to our official record date in order to test mic placement and positions. Literally firing, moving mics a foot, noting the position, and firing again. Then taking everything back to the studio to contrast and compare our favorite positions.
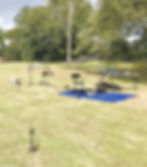
Rather than going through the rigors of explaining every single mic location, I'm drawn up a diagram so you can see it visually.
Just remember, this diagram is what worked for us in our location with our weapons. Yours will likely need to be different than ours, but by all means use this as a starting point for your tests. Make sure and refine it to the sound and perspectives that you're looking to capture.

Break it Down:
Let me break down the purpose of each microphone so that you can have a clear understanding on why we set them up the way we did, and the particular sound we were trying to capture.
Schoeps CMC6 Cardioid ORTF Pair - 10' Back, 3' High
This was the flagship pair for the primary sound of the gun. We'd be leaning on this sound heavily to cover a majority of the final sound that we were after. Mostly captures "crack" & "impact"
Schoeps CMC6 Spaced Pair - 30' Back, 6' High
Equilateral spaced pair. We'd be using this pair to capture a medium range ambience of the blast. Also creates a very wide stereo image.
Crown SASS - 21' Back, 3' High
This mic is the crown jewel for capturing thump from the blast. There is a sweet spot that you must find through testing. You'll know when you've found it as you'll hear the diaphragm "folding-in" on itself causing a saturated thump to your recording.
Sennheiser MKH 416 - 3' Off from Right Side
Captures a nice mid-range grit. This mic is also used for the "in between" moments to grab the mechanics and foley of the gun. Aimed directly at the chamber of the gun.
Sennheiser MKH 60 - 9' Back Aimed Down Range
Intended to capture more of the "down range" sound of the gun. The "shooters perspective" mic. Mid-rangey and sounds like an "old-school" gun shot.
AKG C414 Omni Spaced Pair - 100' Down Range
Aimed at the shooter's position. Used to capture the reverberations of the blast.
AKG C451 - 20' Off from Right Side
Pointed 180deg off-axis of the shooter's position. Used to capture reflections.
Sennheiser MD421 Spaced Pair - 8' Back, 2' High
Spaced pair to capture additional close range crack of the weapon. These are very bright mics. We didn't end up leaning too heavily on these.
Sanken COS-11 Lapel Mic - Attached to Weapon
Attached directly to weapon to capture mechanics and foley between shots.
Put a Sock On It

Last note on mics - WIND PROTECTION! Many of these mics are aimed at capturing every nuance of the reverberations of the gun. All those details can easily get lost behind the wind hitting your capsules. Every mic needs adequate wind protection. Without it - it will plague your recordings. We recommend the biggest fuzzies you can find.
Setting Up Record HQ
We setup basecamp about 150 yards behind the firing position. Lucky for us we used a covered back-porch from a house as our HQ. Power came from the house. All mic lines were run via a 24 channel XLR snake from the firing range to recording HQ. Communication is vital - basic walkie talkie's did the trick here.

Rig Rundown
Here's a rundown of the recording equipment used for the shoot. In a perfect world it's not exactly what we would have chosen, but it's what we had so we made it work!
The recording equipment is the crux of getting a great result for your shoot. Many "budget" type pieces simply won't work when recording firearms. The short answer - Sound Devices preamps & built-in-limiters simply cannot be beat.
Sound Devices 633 & MixPre-D:
Sound Devices has something very special going on under the hood with their limiting. It's extremely fast and gets out of the way very quickly.
Going back to our "popcorn effect" discussion earlier - it's important to note that the Sound Devices limiters can catch this extremely fast & loud transient and then back off so fast to allow the remainder of the blast and tail to pass through. It's almost as if the more you push the preamps into limiting the "cooler" the sounds gets, but don't be fooled here as you're baking more compression into your recording that can never be undone. Best to play it more conservatively here on the preamp level - you can always add more compression in post.
We tested the more budget-friendly Sound Devices "Mixpre-3" series and it just didn't cut the mustard. The limiters are way too slow and result in a super smashed and trashed sound. I suspect other field recorders in this price range would give a similar result.

The combo of the 633 and 2x MixPre-D's gave us a total of 7 killer preamps to work with.
8 Channel Grace Preamp:
Since we only had 7 preamps available with our Sound Devices gear, we turned to an 8 Channel Grace Preamp to allow us to add the additional inputs we needed. These have no limiting built in so we were best suited to use these preamps paired with microphones positioned further from the firing position. Specifically 20ft or more from the shooter. Our focus was to capture more of the ambient nature of the guns with these super clean preamps.
Focusrite Red 8Pre:
Now... so far I haven't mentioned how these sounds were captured to tape. The Red 8 would prove to be a valuable asset here. It has 16 individual line inputs for multi-track recording. So we passed all of our Sound Devices and Grace Preamps into the line inputs of the Red 8 for multi-tracking. It's an audio interface so we paired it with a laptop and Pro Tools in order to effectively record everything simply on one timeline. This kept all of our mics in sync and allowed for easy marking and slating of takes.

Recording
We arrived early on the day of the shoot to do our final checks. Setup was a breeze as we had already come out the day prior and preset cables and stands. The only thing left was to drop in mics, power up, and run some line checks.
Before our talent ever arrived we started running some tests by firing dummy rifles to get level checks and mic positions adjusted just the way we wanted. This is important so we don't waste any of our armorers time when he arrives. The least professional thing you can do when talent arrives is to still be jacking around with cables or trying to track down that illusive dead channel. Be professional and make sure you are ready!
The Shoot
Our safety monitor went through his final checks and gave us the "all clear". Our talent began firing through his arsenal. Levels & spirits were were sitting good. David was great about slating every single take with the firearm name, the ammo caliber, and the character that used the weapon in the film.
Our plan was to record as many diverse weapons as possible with at least 10 shots from every gun. 12 shots for the six-shooters :-). You need to account for some of your shots to be unusable. As a stray bird or wind gust will definitely wreak havoc on some of your recordings. Play it safe and over-record. We also went through different ammo types for some of our guns, to get a variety of sounds.

One note here... It's nearly impossible to accurately monitor during the shooting as the "shock-wave" will bleed right through your headphones. It can be deceiving as you might think you're recording more thump than you really are. I would use breaks between weapon changes to go back and monitor isolated microphones to make sure we were getting the sound we wanted. If I needed to adjust a mic, I'd just this time to make the necessary tweaks.
Let's Get Cocky

Any great gun SFX library would not be complete with hammer pulls, trigger clicks, lever action, and gun cocks. There was no better time than now to record this. After we fired through all our weapons we started recording gun mechanics. I'm so glad we were able to record these as they were critical for bringing realism to the final sound in the film.
Processing
Well... now we've got all these super-clean gun recordings, but now what? On there own they do sound great but they don't quite resemble the "Hollywood" gun sound that our listeners are so accustomed to. Some processing would definitely be in order to really make these guns hit hard.

Much effort was taken in post to make these bad boys really came to life. Next week I'm gonna be breaking down the design process of these gun recordings.
I'll be auditioning the recordings and walking through every step of the processing.
Plus a little added bonus! I'll be giving away this entire library of processed gun sounds for FREE. Just as a thank you for coming back and checking out my article.
Subscribe to our blog by punching in your email below - we'll notify you when the next article drops.
We'd love to hear your questions and experiences on Gun Recording in the comments below.
P.S. We're so proud you made it to the end. Here's a Free Ambience Library from Thunderbird Sound.


